SKILL LEVEL: FIT
Intro
The BeagleBone Black (AKA BBB) is a small, 1GHz ARM Cortex-A8 computer with a powerful NEON accelerator, many pin-outs (65!) and great power handling. In this HOWTO we’re going to use it as the core of a cellular base-station that can interact with mobile phones/handsets; manage calls between handsets, interface between handsets and SIP, sending SMSs, etc.
Why the BBB and not a Raspberry Pi? While lacking the graphical processing power of the R-Pi, the BBB is significantly faster and as such better suited to high-I/O applications like (small-footprint) cellular infrastructure. More so, unlike the R-Pi, the BBB has 4Gb of on-board storage, doing away with the need for an SD Card to boot. This makes the cost of getting setup with a BBB more or less the same as that of a R-Pi but with notably better overall performance (for most applications).
A BBB can be powered from standard 5v DC or with Mini-USB. The advantage of the latter is that during development a USB Ethernet interface can also be created, allowing command-line users a convenient way of working with the board - you get both power and network connectivity over a single USB cable.

For an example of using a DIY BTS in a Critical Engineering context, see PRISM: The Beacon Frame.
For code relating to that project, see Documentation of GSM spoofing strategy used at Transmediale, 2014.
Pre-requisites
This HOWTO assumes certain pre-requisites are taken care of.
- Linux or OS X laptop (this HOWTO assumes the former)
- BeagleBone black
- 4Gb (or more) MicroSD card (for installation only)
- Micro-SDcard sleeve and SDCard reader
- UHD capable Ettus USRP or RTL SDR solution (this HOWTO assumes the former - yes they’re expensive)
- GSM antenna fitted to TRX mount of USRP
- Wired Internet connection (for BeagleBone)
- Basic knowledge of the UNIX command line (we’ll work headless).
- More than a little patience
Flash Debian Wheezy 7 on eMMC
First you need a 4Gb or more MicroSD card. Stick it into your laptop, open up a terminal and type dmesg. Look for “mmcblk” in the output and note it down.
In my case I see:
[25633.985447] mmc0: new SDHC card at address b368
[25633.985738] mmcblk0: mmc0:b368 USD 3.75 GiB
[25633.987178] mmcblk0: p1 p2
For this reason I will choose mmcblk0 as the device representing the MicroSD card.
Now download the Debian image that we’ll use to flash onto the card. Now cd into a familiar place on your operating system (like /home/you/Desktop) and:
Verify the image:
md5sum BBB-eMMC-flasher-debian-7.8-console-armhf-2015-02-19-2gb.img.xz
adbfa79c6748f47e81dd233f06d98b49 BBB-eMMC-flasher-debian-7.8-console-armhf-2015-02-19-2gb.img.xz
Now we can dd it onto the MicroSD (note that I use mmcblk0 - yours may differ!):
unxz BBB-eMMC-flasher-debian-7.8-console-armhf-2015-02-19-2gb.img.xz
sudo dd if=./BBB-eMMC-flasher-debian-7.8-console-armhf-2015-02-19-2gb.img of=/dev/mmcblk0
When done take it out of the laptop and plug it into the unpowered BBB. Plug in an ethernet cable connected to your Internet gateway. I like to have both laptop and ethernet cable on a switch for this next part.
Find a mini-USB to USB cable. Plug the USB end into your laptop.
Now hold down the “Power” button and plug in the mini-USB end of the cable into the BBB, supplying power. Wait for the LEDs to start flashing and release. After a short while you’ll see a LED pulse go from left to right and back again. This indicate the Debian image is being flashed to the eMMC. It will take around 10 minutes and then stop flashing, with all 4 LEDs on and static. This indicates success.
Now remove the Mini-USB cable from the BBB, take out the MicoSD card and plug the Mini-USB jack back into the BBB.
Above information resourced from here.
Configure network between BBB and laptop
Type ifconfig -a on your laptop and you should note a new Ethernet device. In my case it’s labelled eth5. This is an Ethernet over USB device that you can use to connect directly with your BBB.
Ask for a lease from the BBB:
sudo dhcilent eth5 # change “eth5” to whatever you have on your system
Type:
ifconfig eth5
Note the IP you were given. In my case it is always 192.168.7.1. Now test to see if you can ping the BBB:
ping 192.168.7.2
Now ssh into the BBB:
Use debian:temppwd for username and password.
You should now be logged into the BBB and able to start updating.
First, check you are online with the BBB with a simple ping criticalengineering.org. It should’ve been granted an IP by your DHCP server on boot. If not, ask for a new lease.
Change password
passwd
Upgrade Linux kernel on BBB
Click on this link on your laptop and find the latest stable (non-rc) kernel for the BBB. In my case it is v3.15.2-bone2. Right-click on the link for the file “install-me.sh” and copy it to the buffer.
Now on the BBB (not on the laptop) download the file using wget, pasting the link you saved above into your terminal (note my URL may differ from yours):
wget -c https://rcn-ee.net/deb/wheezy-armhf/v3.15.2-bone2/install-me.sh
Make it executable:
chmod +x install.sh
Run it:
sudo ./install.sh
When done, you’ll be asked to reboot the board. Once it’s booted, log in again and type uname -r. It should report you have a new kernel version.
Install software
Update software database:
sudo apt-get update
Install software:
sudo apt-get install vim bash-completion libboost-date-time-dev libboost-filesystem-dev libboost-program-options-dev libboost-regex-dev libboost-system-dev libboost-thread-dev libboost-test-dev subversion git build-essential cmake python-dev autoconf libtool libosip2-dev libusb-dev sqlite3 libsqlite3-dev libreadline6-dev libncurses5-dev localepurge python-cheetah php5 php5-cgi libapache2-mod-php5 libusb-1.0.0-dev libortp-dev
Once installed, type the following to clear out all the downloaded packages from the cache, recovering precious disk space:
sudo apt-get clean
Add extra storage
Now plug in a blank USB stick (or another blank MicroSD card) with more than 2Gb of storage into the BBB. This we’ll use to host the OpenBTS, OSMO-TRX and UHD code repositories.
Type dmesg and note the device in the output. In my case, an 8Gb USB stick appears as /dev/sda1:
As the user debian, create a mount point called src in the home directory of the BBB:
mkdir ~/src
Now we mount it, in such a way that our user, debian, can write to the mount point:
sudo mount /dev/sda1 ~/src -o uid=1000,gid=1000 # note that it may not be /dev/sda1 on your system!
Compile and install UHD, our interface between the BBB and USRP
UHD is the driver from Ettus Research that we need to talk to our USRP
git clone git://github.com/EttusResearch/uhd.git
cd in and create a build directory:
cd ~/src/uhd/host
mkdir build
cd build
I have the B200 USRP. If you have an E100 or other USRP, note that you’ll need to change the value for -DENABLE_B200 (below) to match your setup there. Available options are: USRP1, USRP2, B100, X300, B200.
The below command will build UHD for a USRP B200 (and thus B210), omitting documentation and manpages to preserve eMMC storage space.
cmake …/ -DENABLE_MANUAL=OFF -DENABLE_DOXYGEN=OFF -DENABLE_MAN_PAGES=OFF -DENABLE_B200=ON -DENABLE_USB=ON
Assume all went well, start compiling:
make && sudo make install
Now go and do something entirely unrelated and come back in an hour. Hopefully you’re greeted by sudo asking you for a password needed for install.
Now let’s download the latest firmware using a Python script installed in the last step.
sudo /usr/local/lib/uhd/utils/uhd_images_downloader.py
Compile and install osmo-trx, an ARM-friendly GSM transceiver
The Transceiver52M that ships with OpenBTS is unusable on the BBB. For this reason we’ll install an alternative transceiver called osmo-trx, written by the fine folks at OSMO-COM.
Fetch and build osmo-trx
cd ~/src
git clone git://git.osmocom.org/osmo-trx
It’s very important we compile osmo-trx using the –with-neon option.
cd osmo-trx
autoreconf -i
./configure --with-neon
make
sudo make install
Check out OpenBTS and compile
OpenBTS is the software that provides us with the software part of a cellular station. It allows us to control the transceiver, manipulate our cell station, interface with SIP (for calls and SMS) and all sorts of other things. Importantly we won’t install the OpenBTS applications that are built in the process, rather choosing to place them in a folder in /home/debian/bin.
Ensure you’re in the /home/debian/src directory.
Check out OpenBTS with subversion:
svn co http://wush.net/svn/range/software/public openbts #save as openbts
We need to compile and install a53 first:
cd openbts/a53/trunk
sudo make install
We need to edit a Makefile to represent the correct architecture. While the rest of OpenBTS is fine, the Transceiver component (which we actually replace with osmo-trx) is not. I didn’t find a convenient way or disable the Transceiver52M component. It was easier/faster just to make this one small change to finish the compile:
In the file ~/src/openbts/openbts/trunk/Transceiver52M/Makefile.in, change the line that reads:
AM_CFLAGS = $(STD_DEFINES_AND_INCLUDES) -std=gnu99 -march=native
To:
AM_CFLAGS = $(STD_DEFINES_AND_INCLUDES) -std=gnu99 -march=armv7-a
Now move into the OpenBTS trunk and get building:
cd ~/src/openbts/openbts/trunk
autoreconf -i
./configure --with-uhd
make
Now go and learn an endangered natural language, take up horse-back archery or go to Micronesia in search of a rare, carnivorous and aquatic snail. On your return OpenBTS may have compiled.
Original OpenBTS installation notes are here.
Setup the OpenBTS sqlite3 database
This db holds the runtime configuration of OpenBTS:
sudo mkdir /etc/OpenBTS
sudo sqlite3 -init ./apps/OpenBTS.example.sql /etc/OpenBTS/OpenBTS.db “.quit”
Compile sipauthserve, for cellular subscriber registration
sudo mkdir -p /var/lib/asterisk/sqlite3dir
cd ~/src/openbts/subscriberRegistry/trunk
make
Copy over a database for sipauthserve to work with:
sudo sqlite3 -init subscriberRegistry.example.sql /etc/OpenBTS/sipauthserve.db “.quit”
Compile smqueue, our message manager
Smqueue stores and forwards messages received and sent by OpenBTS in a delay-tolerant way
cd ~/src/openbts/smqueue/trunk/
autoreconf -i
./configure
make
Smqueue needs a database for messages in and out of the system:
sudo sqlite3 -init smqueue/smqueue.example.sql /etc/OpenBTS/smqueue.db “.quit”
Copy compiled binaries to ~/bin folder
Now we’ll now put our freshly compiled OpenBTS applications into a convenient folder:
mkdir ~/bin # probably already exists
cp ~/src/openbts/smqueue/trunk/smqueue ~/bin/
cp ~/src/openbts/subscriberRegistry/trunk/sipauthserve ~/bin
cp ~/src/openbts/openbts/trunk/apps/{OpenBTS,OpenBTSCLI} ~/bin/
You can now unmount the storage device you used to hold the source code we compiled and remove it from the BBB. We don’t need it anymore.
Test the BTS
Now plug in your USRP. You may need to power the BBB from DC as USB power will likely not be enough to drive something like a B200!
Start osmo-trx with the filler table option “Enable C0 filler table”. This enables OpenBTS style idle bursts and retransmissions.
sudo osmo-trx -f
Wait for it to report that the transceiver is up and running. Once it is, SSH in with another terminal and type the following:
cd ~/bin
sudo ./smqueue &
sudo ./sipauthserve &
sudo ./OpenBTS &
Wait for OpenBTS to report that it’s running. You should see something like:
system ready
use the OpenBTSCLI utility to access CLI
Take out your phone and search for networks. You should see a 00101 network. Now start the OpenBTSCLI:
sudo ./OpenBTSCLI
Type ‘help’ to see available commands. Interesting commands to immediately familiarise yourself with are:
config ← dump or set the configuration of your BTS
tmsis ← list IMSIs attached to your BTS
rxgain ← list or set the gain, in dBm, of your BTS
sendsms ← send an SMS to an IMSI
For instance, to allow for automatic registration, use the following command (warning, your neighbours may connect automatically!):
config Control.LUR.OpenRegistration .*
To set the MNC of the BTS to 07 and the MCC to 262 (Germany) on channel 85, you would:
config GSM.Identity.MNC 07
config GSM.Identity.MCC 262
config GSM.Radio.C0 85
Next steps
A natural next step would be to install Asterisk, turning your BTS into a fully functional PBX or communications server. That way people can make calls through your BTS and onto other SIP addresses on the Internet from their phone.
Another would be to write shell-scripts to automate the start up process. I like to write scripts that are started in /etc/rc.local and poll ps intermittently to ensure OpenBTS and/or osmo-trx are still running.
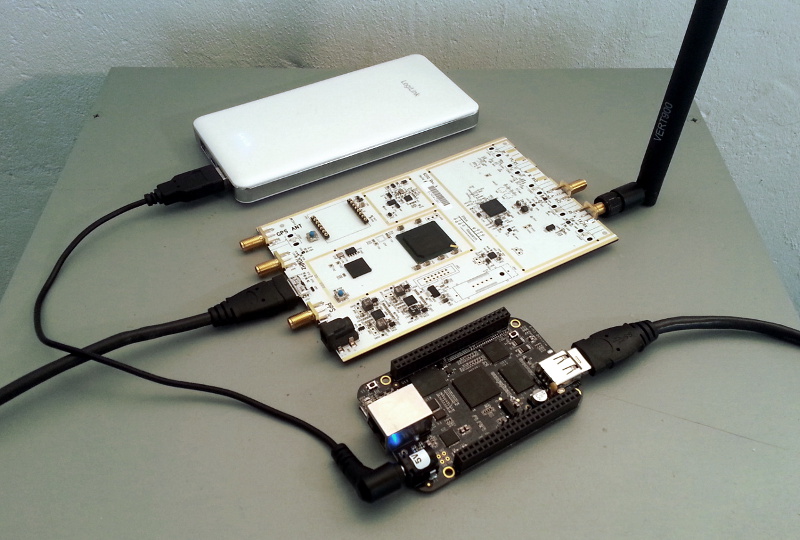
Our finished ‘BoneTS’: BeagleBone Black with 12000mAh 5V Battery, USRP B200 and Vert900 Antenna.